
Are you a Vim veteran looking to expand your repertoire? Or a new user wanting to learn how to customize Vim? Either way, you can configure a Vim word processor.
By the end of this tutorial, you’ll be writing prose with Vim. The step-by-step instructions are easy to follow, doubling as a beginner’s guide to Vim configuration. No matter your Vim experience, you’ll learn something new while making a practical command-line tool.
In this article:
- Video: VimConf 2020 Workshop
- Why Configure a Vim Word Processor?
- Editing the Vimrc
- Plugins for Prose
- Installing a Plugin: vim-Language Tool
- Pandoc File Conversion
VimConf 2020: Vim Word Processor Workshop
Why Configure a Vim Word Processor?
You probably already use Vim to edit config files or write code, but do you have a Vim word processor mode? There are many practical cases for configuring Vim to write prose.
Let’s talk about them:
- Why not? You already know Vim’s excellent for writing code and configs, so why not expand your Vim Universe?
- You’re already there: Programmers and system admins spend much time on the command line. Instead of switching to a GUI, you can edit readme.mds, software documentation, and web content right inside your terminal window.
- Control: Vim is fully customizable, so you shape your own word-processing experience. You choose everything, including formatting, features, and fonts.
- Vim Practice: Typically, we type more words per minute when writing prose than when coding or configuring. The more keystrokes of Vim practice you get, the quicker you’ll become proficient.
- Learning Vim Config: After completing this project, you’ll understand how to configure Vim. We go through significant components, including editing a vimrc file and installing a plugin.
Configure Vim by Editing the Vimrc File
Now that you realize you need a Vim word processor, it’s time to edit your vimrc. Inside the vimrc file, customize settings, key mappings, and commands.
Step 1: Open the Vimrc File
The following command will open the vimrc file or create one if it does not already exist.
$ vim ~/.vimrcStep 2: Create a Function
Creating a function lets us switch the configuration on and off at will, so we don’t write code and configs using our word processor settings.
[Type “i” to get to insert mode]
function! Writer()
endfunctionFunction declaration:
- We called the function Writer
- Writer() has no arguments
- The bang attribute (!) ensures that Writer() replaces any existing functions with the same name
Step 3: Config Spell Check
Vim comes with a built-in spellcheck tool. We just have to configure it to the appropriate language. I’m configuring mine to American English (en_us).
function! Writer()
 setlocal spell spelllang=en_us
endfunctionFor more options, check out the Vim Spellcheck documentation.
Step 4: Create a Vim Word Processor Command
We’ll create a command to execute Writer().
com! WR call Writer()Step 5: Test Our Word Processor Function
Now, it’s time to test our code.
function! Writer()
 setlocal spell spelllang=en_us
endfunction
com! WR call Writer()[Press escape to go to command mode, then type ZZ to save and quit.]
Once on the command line, create and open a new vim file. Mine is example.txt.
$ vim example.txtWhile still in command mode, enter our Writer() command.
:WRNow, let’s get into insert mode and type some text. Be sure to misspell some words. Vim highlights misspelled words in red.
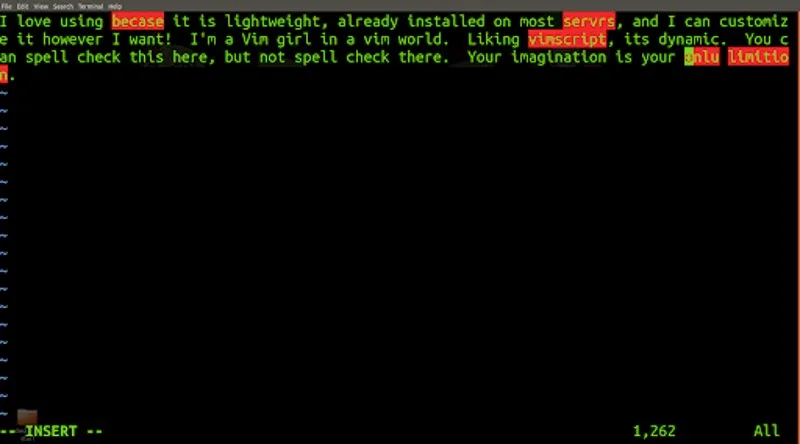
While in command mode, fix misspelled words:
- Navigation: Use ]s and [s to navigate the misspelled words.
- Seeing suggestions: When you get to a word you want to fix, type z= to see a list of spelling suggestions.
- Choosing a suggestion: Each suggestion has a corresponding number. Type the suggestion’s number, then enter.
- Adding a new word: To add a word to the dictionary (instead of correcting it), type zw.
![navigate mispelled words, ]s right. [s left](https://sselzer.com/wp-content/uploads/2025/09/navigate-mispelled-words-1.webp)
Save and quit (ZZ), then go back to your vimrc.
$ vim ~/.vimrcStep 6: Text Formatting Options
Add the following code.
setlocal formatoptions = t1So, Writer() looks like this.
function! Writer()
  setlocal spell spelllang=en_us
  setlocal formatoptions = t1
EndfunctionText format options:
- t : Text wrap
- 1: insert a line break before one letter words instead of after them.
- See the Vim documentation on text formatting for more options.
Step 7: Set Text Width
I set my text width to 80 characters, but I suggest you test a few.
setlocal textwidth = 80Step 8: Indentation
I turned off auto-indent, but you can see more options in the Vim documentation on indenting.
setlocal noautoindentStep 9: Setting Spaces
I set the tab and shift keys to standard paragraph indentation, 5 spaces.
  setlocal shiftwidth=5
setlocal tabstop=5expandtab reads tabs as tabs instead of single spaces.
setlocal expandtabFor now, we’re done editing our vimrc.
function! Writer()
setlocal spell spelllang=en_us
setlocal formatoptions = t1
setlocal textwidth = 80
setlocal noautoindent
  setlocal shiftwidth=5
  setlocal tabstop=5
setlocal expandtab
endfunction
com! WR call Writer()Save and quit (ZZ).
Vim Word Processor Plugins
Let’s look at Vim plugins for writing prose:
- Grammar Checker: No word processor is complete without a grammar checker. The best Vim grammar checker I’ve found is vim-LanguageTool.
- Online Thesaurus: vim-online-thesaurus is my favorite Vim thesaurus plugin.
- Offline Thesaurus: If you need an offline thesaurus tool, thesaurus_query. Vim is an excellent option.
Installing vim-Language Tool on Vim 8.0
We’ll create a Vim plugin directory, then install the vim-Language Tool and its dependencies. Once installed, we configure its file location and language.
Operating system: I use Ubuntu Desktop. If you’re not using an Ubuntu or Debian OS, commands may differ.
Step 1: Check Your Vim Version
$ vim --versionStep 2: Create a Vim Plugin Directory
$ mkdir ~/.vim/pack/bundles/start/All Vim plugins go into this directory. If you want to organize your plugins, you can add sub-directories to /bundles/. Just make sure you make /start/ in each sub-directory.
Step 3: Install Dependencies
To use the vim-Language Tool, we must first install:
- Java Runtime
- Language Tool Desktop Software
First, we’ll install the Java Runtime.
$ sudo apt install default-jreNext, we install the Language Tool Desktop Software.
Go to the download page and scroll down to the Desktop Version. After downloading, unzip the directory.
Step 4: Install the Plugin
Go to your plugin directory.
$ cd ~/.vim/pack/bundles/start/Then download the tool from GitHub by typing “git clone” followed by the repository link.
$ git clone https://github.com/dpelle/vim-LanguageToolStep 5: Configuration
First, locate languagetool-commandline.jar. The file is inside the Language Tool directory. You can find it using the following command.
$ locate languagetool-commandline.jarNow, let’s open the vimrc file.
$ vim ~/.vimrcSet the tool’s file location.
let g:languagetool_jar='/home/candy/LanguageTool-5.0/languagetool-commandline.jar'Set your language. Mine is American English.
let g:languagetool_lang='en_us'Now, you’re ready to test your Vim grammar checker!
Using Pandoc for Command-line File Conversion
You might be okay with using Vim-friendly file formats, but others may not. If someone wants a Docx or PDF, you can use Pandoc to convert file formats
Step 1: Install Pandoc
The command below works on Ubuntu/Debian operating systems.
$ sudo dpkg -i $DEBThe following command works on other distros.
$ tar xvzf $TGZ --strip-components 1 -C $DESTStep 2: Convert a File
Read the Pandoc Documentation and find the appropriate configuration command.
As an example, I will convert lamp.md to lamp.docx.
$ pandoc -s -S lamp.md -o lamp.docxFinal Thoughts
Vim is a handy terminal word processor. It’s lightweight and completely customizable. Plus, plugins easily enhance Vim’s out-of-the-box features. So, what will your Writer() include? With the power of Vim at your fingertips, you’re only limit is your imagination.
Talk FOSS to Me
Howdy, I’m Shelly Selzer, a freelance technical writer who translates complex open-source tools into plain English — with relatable, real-world examples.

📬 Subscribe to my blog to get fresh tutorials delivered straight to your inbox.
💼 Hire me through my contact page.